


How does my customer furnish a room with the configurator?
With the room planner, your customer draws their own room and places a complete kitchen, bathroom or wall of cabinets in it, with overall dimensions, worktop and plinth, and one total price.
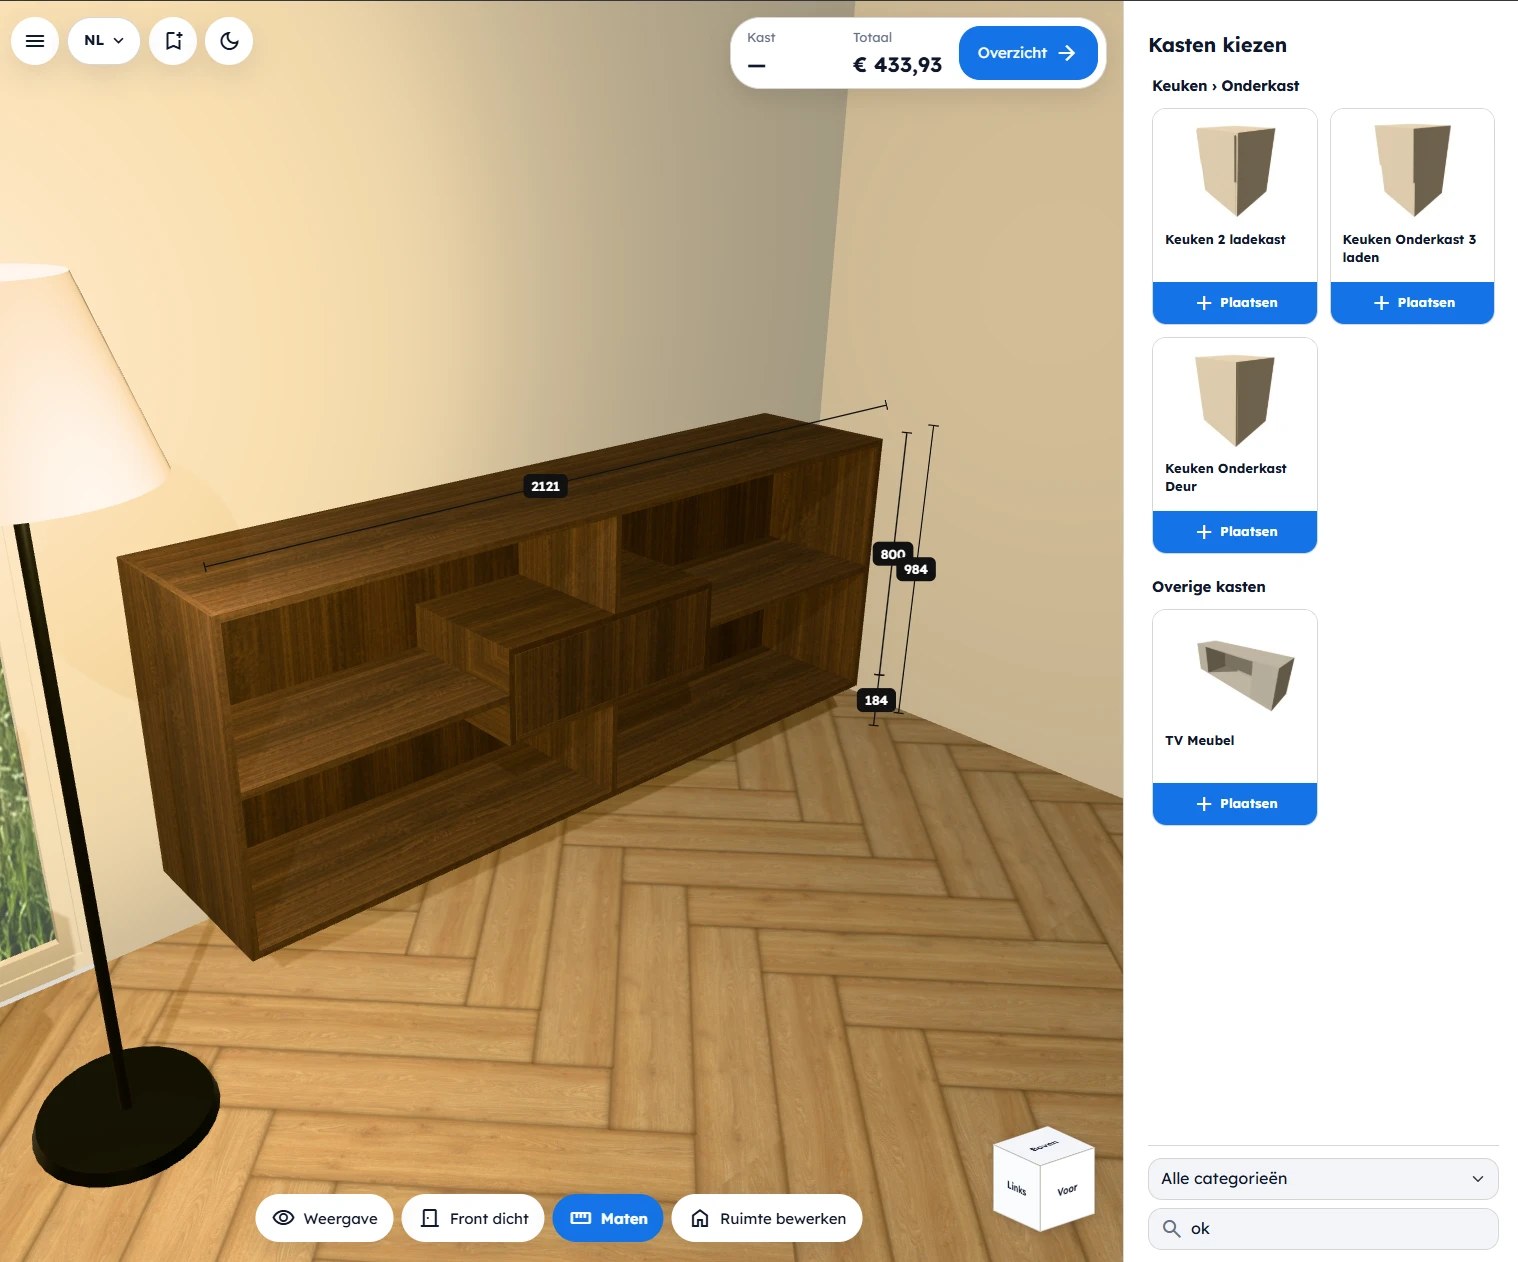
Short answer: In the configurator with room planner, your customer first draws their own room, with sloped walls, doors and windows. They then drag cabinets from your catalogue into the room, choose size and colour in a few clicks and immediately see the price of the whole layout. This way your customer sees a kitchen, bathroom unit or wall of cabinets exactly as it will actually stand: with overall dimensions, a continuous worktop and plinth, and one total price. If they are happy, they order the configuration straight away. In Wood Intelligence implementations, we see that customers decide much faster when they see their cabinet in their own room rather than on an empty surface.
Applies to
- The online configurator of Wood Intelligence Plus, with the room planner (on screen: Edit room and Edit floor plan)
- Your end customer, on your own website
- Available in Dutch, English, German and French; you can add extra languages yourself
- Last checked: November 2026
How you as an administrator prepare a cabinet is explained in How do I prepare a cabinet for the online configurator?
Why a room planner?
Designing a single cabinet is straightforward. But most interiors consist of several cabinets that together form one whole, in a room with walls, a door, a window or a sloping ceiling. Your customer wants to see that complete layout as it will eventually look in their home. That is what the room planner is for: everything comes together in one model.
A few examples from practice:
- Kitchen: a row of base units with a tall unit for the oven and fridge, and wall units above. The worktop runs in one piece across all base units, the plinth runs underneath and there is a light rail under the wall units. Your customer immediately sees whether the kitchen fits between the two walls and how much space is left.
- Bathroom: a vanity unit with a tall column cabinet next to it, between the door and the shower. Your customer sees the distance to the walls and to the next cabinet while moving the cabinets.
- Wardrobe or walk-in wardrobe: a wall of cabinets from wall to wall, sometimes under a sloping roof. With the overall and intermediate dimensions, your customer immediately sees how many cabinets fit and how wide each cabinet will be. A cornice finishes the wall in one line at the top.
- Bespoke living room furniture: a TV wall with closed cabinets left and right and open compartments in between, a bookcase around a door or a desk between two cabinets.
In Wood Intelligence implementations, we see the same thing every time: the end customer's question is rarely “what does this cabinet cost?”, but “what does my kitchen cost, and will it fit?”. The room planner answers that question in one view.
What does your customer see of the whole layout?
- Overall and intermediate dimensions: above each cabinet is the width of that cabinet, and above that the overall dimension of the whole layout. At the side is the height build-up, for example plinth, base unit and worktop, with the total height.
- Distance to the walls: while your customer drags a cabinet, they see the free space to the left and right live, up to the wall or the next cabinet.
- Continuous linear parts: plinths, worktops, cornices, light rails and handle rails run as one part across adjoining cabinets. If a cabinet is deeper or lower, or does not connect, the configurator turns them into separate parts. If a part is longer than the maximum length, the configurator splits it at a cabinet joint and reports this.
- One total price: at the top you see the price per cabinet and the Total of the layout. The linear parts appear as separate lines in the order, so the worktop and the plinth are included in the price too.
- One complete view: in 3D your customer sees the complete layout photorealistically in their own room, from every side.
Which linear parts belong to a cabinet is something you as an administrator set per cabinet category under Linear parts per cabinet category: Automatic, Optional or No. A base unit thus automatically gets a worktop and plinth, a wall unit a light rail. For a selected cabinet, your customer can switch off an automatic part under Linear parts, for example the plinth under a cabinet that stands on legs.
Room or stand-alone layout: you choose per cabinet
Designing in a room is slightly more work for your customer than putting together a single cabinet: they first draw the room and then place the cabinets. That is why you as an administrator choose per cabinet whether it is designed in a room or as a stand-alone layout. Open the cabinet in Wood Intelligence Plus and go to Configurator → Room → Allow multiple cabinets.
- Stand-alone layout (Allow multiple cabinets off): for a piece of furniture that stands on its own. Your customer can design a TV cabinet, a sideboard or a free-standing bookcase perfectly well without a room: they choose size and colour and order. See How does the configurator work for a single cabinet?
- In a room (Allow multiple cabinets on): for anything that consists of several cabinets and has to fit the room exactly. You don't design a kitchen as a single cabinet: there, the overall dimensions, the walls and the continuous worktop are the very core.
Step 1: draw the room
Your customer starts with their own room. Under Floor plan they choose a Room shape or draw a Custom shape, and enter the Width, Depth, Ceiling height and Wall thickness.
- Click a wall to select it.
- Click the dimension in the drawing and type the new length. All dimensions are internal dimensions.
- Drag a wall or corner point to change the shape. Click a corner point to chamfer the corner.
- Add extra details with Add corner, Add recess or Add protrusion.
Step 2: doors, windows and colours
When your customer clicks a wall, a menu appears with Length, Corner, Recess, Protrusion, Slant, Door or window and Colour. Under Doors and windows they choose a model and set the distance, width, height, Opening direction, Hinge side, Door colour and Frame colour. Under Finish they choose the colour of the walls and floor.
Done? Click Save and return.
Step 3: place cabinets
On the right is Choose cabinets: all the cabinets you have published, by category. With the category selector and the search field at the bottom, your customer quickly finds the right cabinet.
- Click Place next to a cabinet, or drag the cabinet into the room.
- Put the cabinet against a wall. It snaps magnetically to the nearest wall.
- Rotate the cabinet with the button at the bottom, or enter the values Left / right, Above floor and Front / back under Position (mm).
Step 4: choose size and colour
When your customer selects a cabinet, the questions you have prepared for that cabinet appear on the right, such as the Width or Choose the carcass colour. One click on a colour or a new size, and the cabinet adapts. At the top they see the price of this cabinet and the Total of the whole layout. With Add another cabinet they add the next cabinet.
Step 5: several cabinets side by side
Your customer can place as many cabinets as they like, for example a complete kitchen wall or a wall of cabinets with a desk in between. Cabinets connect to each other automatically and cannot overlap. If there is no room at a spot, the configurator reports No free space at this position.
When your customer selects a cabinet, a toolbar appears below the room:
- Swap cabinet to the left and Swap cabinet to the right: the cabinet swaps places with its neighbour. The rest of the row moves along neatly.
- Move cabinet: drag the cabinet freely through the room.
- Rotate cabinet 90° clockwise.
- Magnetic walls: the cabinet is automatically placed with its back against the wall.
- Copy cabinet as new position: an exact copy with the same dimensions and colours appears right next to the original. If there is no room there, the copy finds the nearest free spot.
- Delete cabinet.
Prefer to be exact? Enter the distance Left / right, Above floor and Front / back under Position (mm), for example for a wall unit above a base unit.
Step 6: group cabinets and change them together
Should all cabinets get the same colour? Then your customer does not have to adjust them one by one.
- Click Select cabinets in the toolbar.
- Tick the cabinets that should change together. The list shows them by category, with a tick box per cabinet, per category or for everything. You can also tap cabinets in the room, and with Shift or Ctrl + click your customer selects several at once.
- The questions the selected cabinets have in common appear on the right. For a question, they see for example Applies to 2 of 3 cabinets, or Mixed if the cabinets currently have a different choice.
- Choose the colour or size once. It applies immediately to all selected cabinets.
Each cabinet gets a position number (001, 002, …) that appears in the order. With Renumber positions, the configurator numbers the cabinets in order of placement: from left to right, then from bottom to top.
Step 7: view in 3D
In 3D your customer sees the cabinet photorealistically in their own room. The materials have PBR settings, a technique from the games industry: wood, lacquer and melamine respond to light as they do in real life. At the bottom you will find:
- View: choose a different view, or temporarily hide decoration and the room.
- Front closed: open and close fronts.
- Dimensions: show or hide dimension lines.
- Edit room: back to the floor plan.
With the cube at the bottom right, they quickly turn to the front, side or top view.
Step 8: order
Happy with it? Your customer clicks Overview at the top, completes the order summary and places the order. If they want to change something, they simply go back to the room.
Why this approach?
Buying a made-to-measure cabinet is a big step for most people. They want to see whether it fits and how it looks next to the door, under the sloping ceiling or in that one niche. By drawing their own room first, your customer answers that question themselves, before they even call you.
At the same time, it stays simple for the customer. They only choose what you as an administrator have made available, and the price is calculated instantly. This gives you an order that is technically correct and a price you can stand behind.
The room planner and the configurator are fully translatable. Dutch, English, German and French are available as standard, and you can add an extra language in a few clicks. That way you address your customer in their own language.
Please note
- All dimensions in the room are internal dimensions. Measure from wall to wall, not to the outside of the wall.
- You save changes to the room with Save and return. With Cancel, everything since opening is discarded.
- Is a cabinet missing from the catalogue? Then it has not been published. Check Ready to publish on the cabinet.
Would you like to see the configurator with room planner on your own cabinets? Via Get to know us you can schedule a short demo with Wood Intelligence.
Frequently asked questions
Can my customer draw a room with sloped walls or a niche?
Yes. Choose Custom shape, drag walls and corner points, or use Slant, Recess or Protrusion in the wall menu.
Can my customer place several cabinets in one room?
Yes, if you have allowed this for the cabinet with Allow multiple cabinets. Cabinets connect to each other, and at the top the customer sees the price per cabinet and the total of the layout.
Which languages does the configurator work in?
As standard in Dutch, English, German and French. You can add extra languages in a few clicks.
Why do the materials look so realistic?
The materials have PBR settings, a technique from the games industry. As a result, wood and lacquer respond to light as they do in real life.
Can my customer still change something after the overview?
Yes. From the order summary, the customer goes back to the room and continues adjusting the configuration.
Can my customer copy a cabinet with the same settings?
Yes. Select the cabinet and click Copy cabinet as new position. The copy has the same dimensions and colours and is placed next to the original, or at the nearest free spot.
How do I give several cabinets the same colour at once?
Click Select cabinets, tick the cabinets and choose the colour once. It applies to all selected cabinets that have this choice.
Why is a room planner useful for a kitchen or wall of cabinets?
Because a kitchen or wall of cabinets consists of several cabinets that have to fit the room together. In the room planner your customer sees the overall dimensions, the intermediate dimensions, the distance to the walls and a continuous worktop and plinth, with one total price for the whole layout.
Do the worktop, plinth and cornice run continuously across several cabinets?
Yes. Linear parts such as the plinth, worktop, cornice and light rail run as one part across adjoining cabinets. If a cabinet is deeper or lower, or the part is too long, the configurator turns them into separate parts. The linear parts are included in the price.
When do I choose a stand-alone layout instead of a room?
For a piece of furniture that stands on its own, such as a TV cabinet or sideboard. Your customer then only chooses size and colour. For a kitchen or wall of cabinets, switch on Allow multiple cabinets so your customer designs in the room.
Further reading
- How do I prepare a cabinet for the online configurator?
- How does the configurator work for a single cabinet?
- The Wood Intelligence 3D configurator
- Which materials and edge banding are in the Wood Intelligence Plus library?
More than one solution
Almost every question in this knowledge base has more than one solution. The best fit depends on your workflow, machinery and integrations. Not sure which applies to you, or are you using software we don't (yet) support? Feel free to email Wood Intelligence. We're happy to think along with any challenge.
imos is a brand of imos AG; Wood Intelligence is an independent consultancy.