


How do I prepare a cabinet for the online configurator?
Behind every simple configurator is a well-prepared cabinet. In Wood Intelligence Plus you set up the design, cost price and customer questions, without programming.
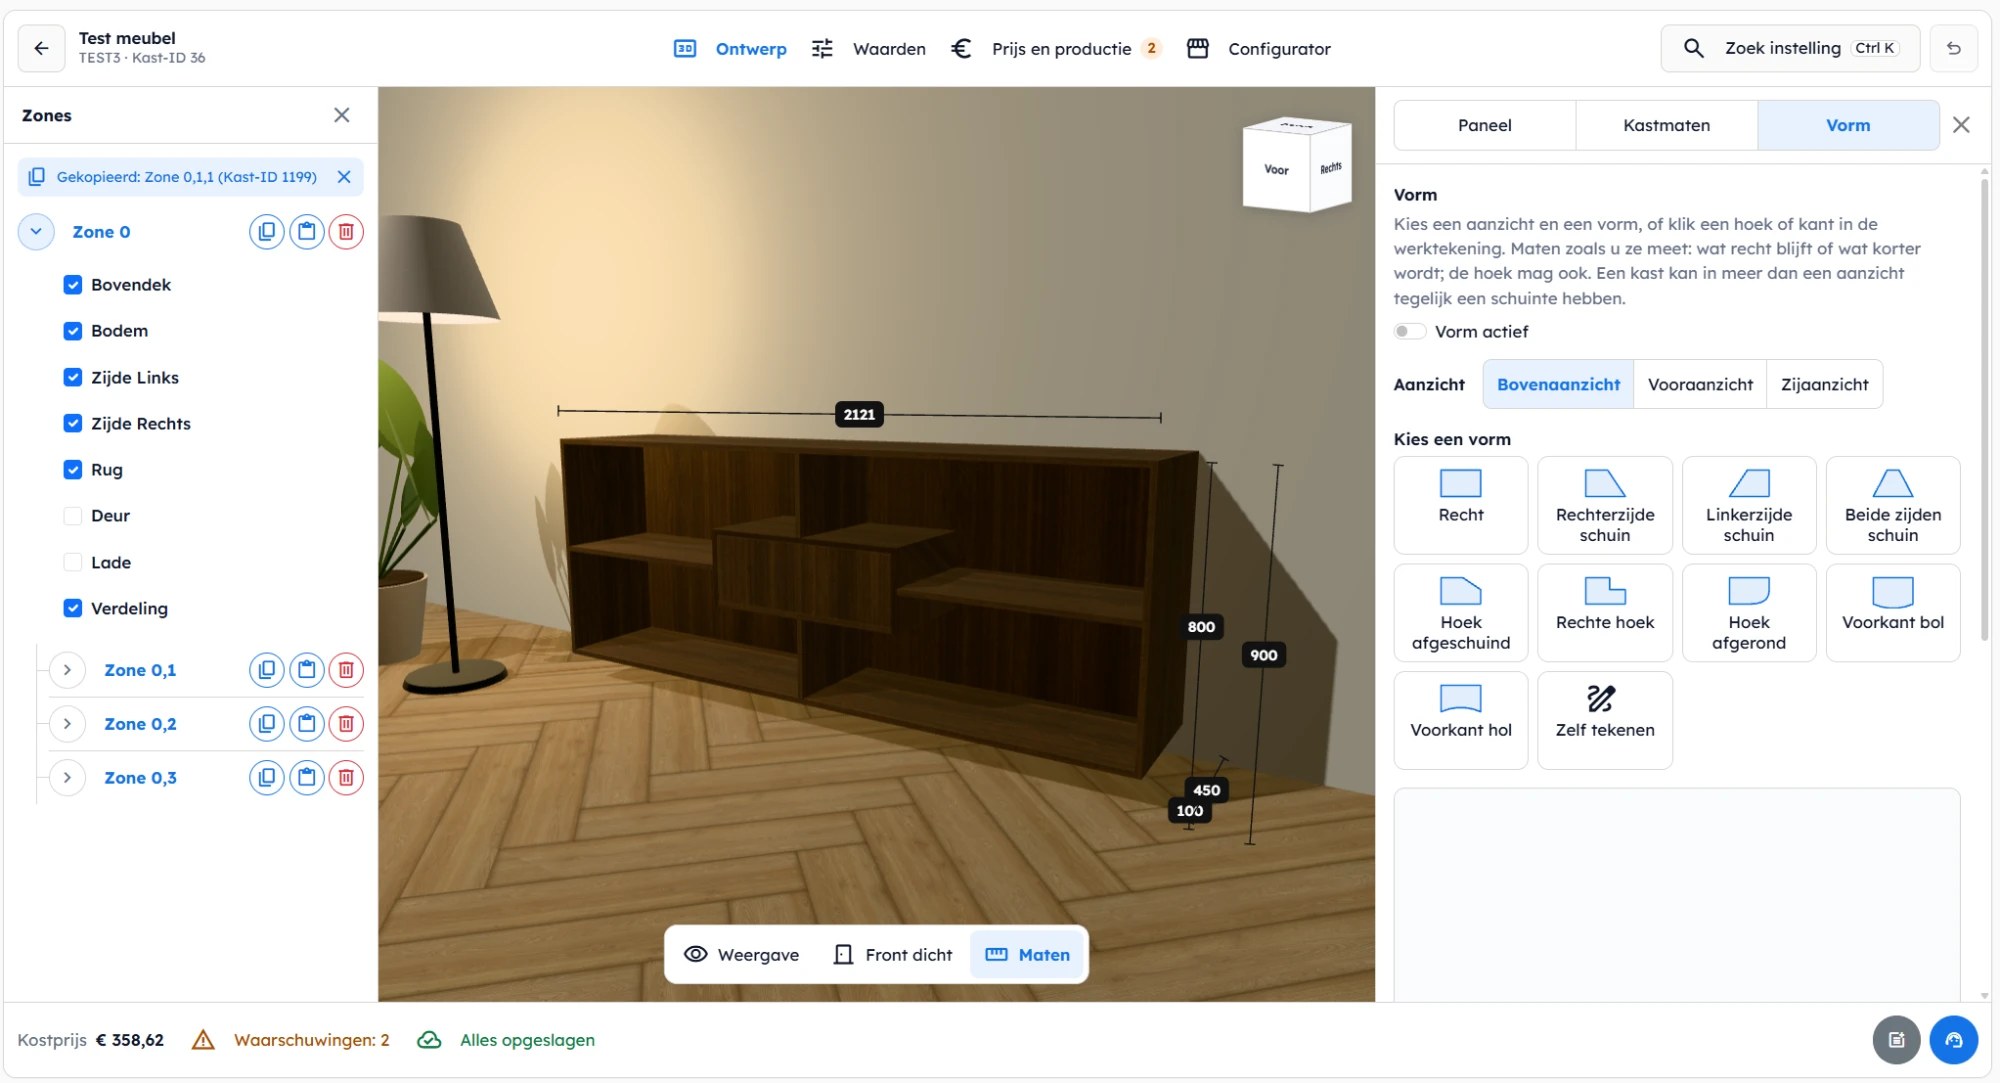
Short answer: A configurator has to be simple for your customer. That only works if the cabinet behind it is well prepared. You do that preparation as an administrator in the cabinet editor of Wood Intelligence Plus: you design the cabinet, check the cost price and decide which few choices your customer gets. No programming is needed. In Wood Intelligence implementations we see that doing this work properly once makes the difference: from then on, every customer can put together a made-to-measure cabinet themselves, with a price that is correct.
Applies to
- Wood Intelligence Plus, menu Cabinets → open a cabinet
- Administrators who set up cabinets for the configurator. Your end customer does not see this screen.
- No imos iX, ERP or CNC integration needed
- Last checked: November 2026
Two sides of the configurator
- Behind the scenes (this article): you define how the cabinet is built, what it costs and what the customer may choose. This is specialist work and can be as detailed as you need.
- For your customer: in the room planner, the customer only chooses what you have released, such as width, height and colour, and immediately sees the cabinet and the price. That leads to a quote. To see how that works, read How does my customer furnish a room with the configurator?
The more you define here, the less your customer has to choose.
Four steps, from left to right
At the top of the cabinet editor there are four tabs. Work through them in this order:
- Design: what does the cabinet look like and which dimensions may change?
- Values: which default values and materials are used in the calculation?
- Price and production: what does the cabinet cost?
- Configurator: which questions does the customer get and how does the cabinet go online?
At the bottom of the screen you always see the cost price, the number of warnings and whether everything has been saved.
Step 1: design the cabinet
On Design you build up the cabinet. On the left, the cabinet is shown as a tree of zones: Zone 0 is the whole cabinet, and a division creates compartments such as Zone 0,1 and Zone 0,2. For each zone, you tick what belongs in it, such as bottom, sides, back, door or drawer. Click a part and, on the right under Panel, choose how it looks and how it is connected.
You make the most important choice on Dimensions. For each dimension you decide:
- Fixed dimension: the customer cannot change it.
- Variable: click the link button and choose, for example, the variable for the width. You can later put that dimension to the customer as a question.
Does the cabinet need to be slanted, rounded or fit under a sloping roof? Then on Shape, turn on the Shape active switch, choose a view and a shape, and enter the dimensions. The cabinet adapts automatically.
Step 2: default values and materials
On Values → Item variables you see the values this cabinet is calculated with by default. Change a value with the pencil icon.
On Values → Materials you choose which decors and colours the customer may select: choose All, tick them and click Assign selection. For each material you see how the price is calculated: Per m², Per sheet (rounded up to whole sheets) or Per usage (what is actually cut from the sheets).
Step 3: check the cost price
On Price and production you see what the cabinet costs, broken down into material, edge banding, connectors and accessories, with the parts list below. On the Rules tab you add your own calculation rules, such as labour or a surcharge. Also resolve the messages under Warning before the cabinet goes online.
Step 4: add questions and publish
- Open Configurator → Questions and click New question. Link each question to a variable, for example the width or the material.
- On Images, use Take photo to create a thumbnail from the 3D view.
- On Room, choose how the cabinet is shown, for example with walls, floor and accessories.
- On the right, under Ready to publish, check that every item has a tick and turn on Show in online configurator.
- On Publish, copy the link, the iFrame code or the button code for your website.
Why this way?
Putting together a made-to-measure cabinet is difficult for the average customer. Every extra question is a reason to drop out. So only ask what is really needed: height, width, depth, and possibly a material and a colour. Everything else you define yourself in the design and the default values.
You check the cost price before publishing, because made-to-measure work only pays off if you can calculate it properly. If the customer chooses a different dimension, the cabinet recalculates, including your surcharge.
Common mistakes
- Too many questions. A configurator with ten questions feels like work to your customer.
- A fixed dimension that the customer needs to be able to choose. You can only use a dimension with a variable as a question.
- Publishing without looking at the cost price. Check Price and production and the warnings first.
Would you like help with your first configurator cabinet or with choosing the questions? Via Get to know us you can schedule a short call with Wood Intelligence.
Frequently asked questions
Do I need to be able to program to create a configurator?
No. You set everything up via the tabs of the cabinet editor: design, values, price and questions. The configurator for your customer is built from that.
Does my customer see this screen?
No. This is the admin screen. Your customer only sees the questions you release, with the cabinet in 3D and the price.
How do I let the customer choose the width themselves?
On Design → Dimensions, link the width to a variable. Then, on Configurator → Questions, create a question that uses this variable.
Why can't I open the other tabs for a new cabinet?
A new cabinet must be saved first. The other tabs become available after saving.
My cabinet is not in the configurator. What should I check?
On Configurator, look under Ready to publish. Every item must have a tick, and Cabinet active and Show in online configurator must be turned on.
Further reading
- The Wood Intelligence 3D configurator
- What is Wood Intelligence Plus?
- Which materials and edge banding are in the Wood Intelligence Plus library?
More than one solution
Almost every question in this knowledge base has more than one solution. The best fit depends on your workflow, machinery and integrations. Not sure which applies to you, or are you using software we don't (yet) support? Feel free to email Wood Intelligence. We're happy to think along with any challenge.
imos is a brand of imos AG; Wood Intelligence is an independent consultancy.